Contact Us

How To Setup ProxySQL(MySql Proxy) Server ? Part -1
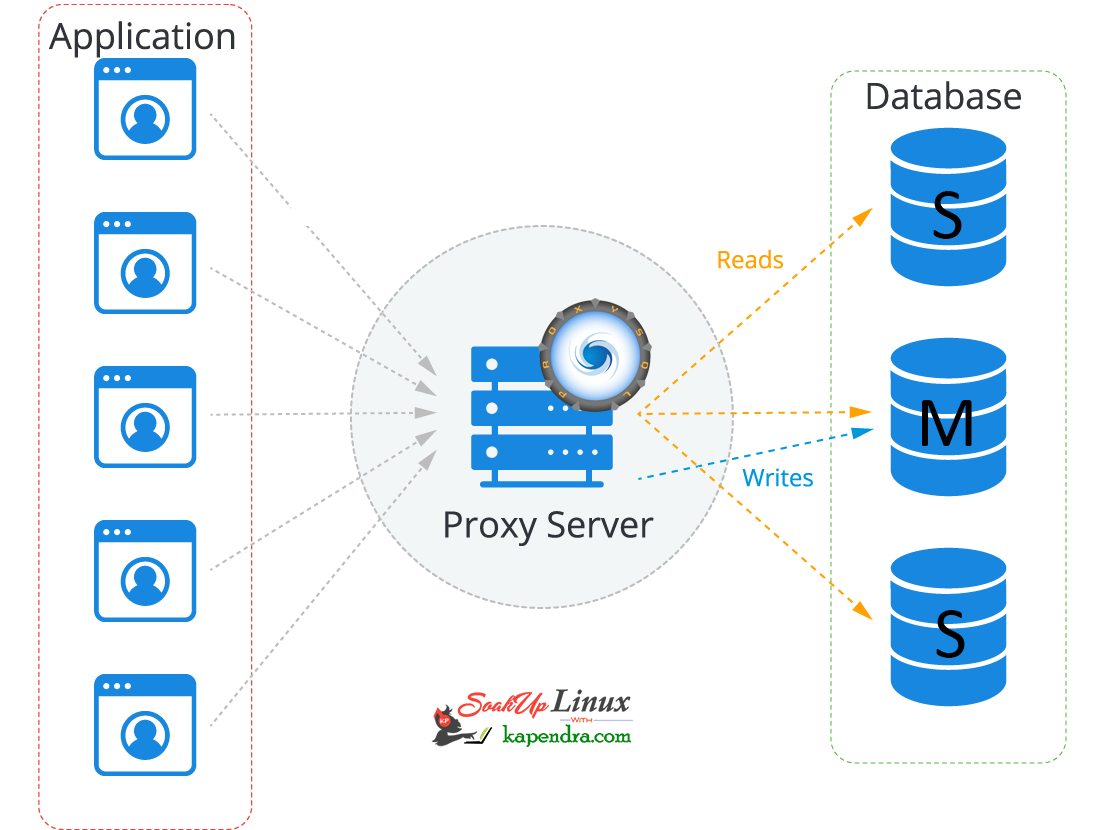
Read with Slave and Write with Master
In today’s world, most of the infra is cloud-based now and these cloud services are reliable nowadays. if we have a look at RDS in AWS there are reader and writer and AWS RDS decide where to send read/write request. In an ideal scenario, the read request should get the server via MySql slave and write request with MySQL master.
Most organizations still use self-hosted MySQL server setups, thus making the ideal situation a bit tough, in this article, we will learn about MySQL Proxy.
What is MySQL Proxy?
Using MySQL Proxy an application may communicate between one or more MySQL servers and one or more MySQL clients over the network
Why Mysql Proxy?
MySQLProxy is a middle layer sitting between a MySQL database and an application. The application connects to a proxy, which then forwards connections into the database and it works the application layer.
So let’s start getting our hands dirty
Our Scenario:
Host OS: Ubuntu 18.04
RAM: 2GB memory
Proxy server: 172.31.2.24
Master IP: 172.31.2.196
Slave IP:-172.31.2.162
Let’s Start
Step 1: Add MySQL Proxy Repository
To install MySQL proxy we need to set up a repository. follow the below command to install the repo on the Proxy server host.
[ec2-user@mysql-proxy ~]$ apt-get install -y lsb-release
[ec2-user@mysql-proxy ~]$ wget -O - 'https://repo.proxysql.com/ProxySQL/repo_pub_key' | apt-key add -
echo deb https://repo.proxysql.com/ProxySQL/proxysql-2.0.x/$(lsb_release -sc)/ ./
| tee /etc/apt/sources.list.d/proxysql.list
Step 2: Install MySQL
Run the below command on the Proxy server host
[ec2-user@mysql-proxy ~]$ apt-get update
[ec2-user@mysql-proxy ~]$ apt-get install proxysql
Note: By default, ProxySQL binds with two Ports 6032 and 6033.
MySQL 6032 is the admin port and 6033 is the one that accepts incoming connections from clients.
Step 3: Start ProxySQL
Now run this simple command to start and enable ProxySQL
[ec2-user@mysql-proxy ~]$ systemctl start proxysql
[ec2-user@mysql-proxy ~]$ systemctl enable proxysql
Alternatively, we can do this via the Admin interface as well.
[ec2-user@mysql-proxy ~]$ mysql -u admin -padmin -h 127.0.0.1 -P6032 --prompt='Admin> '
Admin> proxysql start
Admin> proxysql stop
Step 4: Configuring ProxySQL via the admin interface
Before entering the admin interface of ProxySQL, create one application user with all privileges required for your application and one monitoring user at every MySQL DB server.
On Mysql Master Host
[ec2-user@mysql-proxy ~]$ mysql -u root -ppassword
mysql> CREATE USER 'sysbench'@'%' IDENTIFIED BY 'sysbench';
mysql> GRANT ALL PRIVILEGES on *.* TO 'sysbench'@'%';
mysql> CREATE USER  'monitor'@'%' IDENTIFIED BY 'monitor';
mysql> GRANT USAGE,REPLICATION CLIENT on *.* TO 'monitor'@'%';
mysql> FLUSH PRIVILEGES;
On the Proxy server host
After installation making the service up and creating the application user, we need to configure ProxySQL
In this setup, we are used using need 2 host groups
hostgroup 0: For the master [Used for Write queries]
hostgroup 1: For the slaves [Used for read Queries]
[ec2-user@mysql-proxy ~]$ mysql -u admin -padmin -h 127.0.0.1 -P6032 --prompt='Admin>'
Admin>show databases;
+-----+---------------+-------------------------------------+
| seq | name          | file                                |
+-----+---------------+-------------------------------------+
| 0   | main          |                                     |
| 2   | disk          | /var/lib/proxysql/proxysql.db       |
| 3   | stats         |                                     |
| 4   | monitor       |                                     |
| 5   | stats_history | /var/lib/proxysql/proxysql_stats.db |
+-----+---------------+-------------------------------------+
5 rows in set (0.00 sec)
Add Master for reading and writing requests.
Admin>INSERT INTO mysql_servers(hostgroup_id,hostname,port) VALUES (0,'172.31.2.196',3306);
Admin>INSERT INTO mysql_servers(hostgroup_id,hostname,port) VALUES (1,'172.31.2.196',3306);
Add slave for reading requests
Admin>INSERT INTO mysql_servers(hostgroup_id,hostname,port) VALUES (1,'172.31.2.162',3306);
Proxysql 2.0 comes with native monitoring for Aurora, by checking the variable “Innodb_read_only”, to determine the reader/Writer for the individual nodes, This info of check has to be added to the table “mysql_replication_hostgroups” in ProxySQL
Admin>insert into mysql_replication_hostgroups values (0,1,'read_only','STG');
Admin>LOAD MYSQL SERVERS TO RUNTIME;
Admin>SAVE MYSQL SERVERS TO DISK;
Note: When we load MYSQL SERVERS, Our writer host also gets configured in the reader host group automatically by ProxySQL to handle all those queries which are redirected to the reader host group in case no slaves are online.
this is optional to decrease the weightage assigned to master servers inside the mysql_server table for the reader host group so that most of the read queries will go on the server which has a higher weight.
Admin>UPDATE mysql_servers SET weight=200 WHERE hostgroup_id=1 AND hostname='172.31.2.196';
Admin>UPDATE mysql_servers SET weight=1000 WHERE hostgroup_id=1 AND hostname='172.31.2.162';
Configure Monitor
monitor user will continuously check the status of the backend in a specified interval.
sysbench is the user, created for the application.
Admin> UPDATE global_variables SET variable_value='monitor' WHERE variable_name='monitor';
Query OK, 0 rows affected (0.00 sec)

Admin> LOAD MYSQL VARIABLES TO RUNTIME;
Query OK, 0 rows affected (0.00 sec)

Admin> SAVE MYSQL VARIABLES TO DISK;
Query OK, 116 rows affected (0.03 sec)

INSERT INTO mysql_users(username,password,default_hostgroup) VALUES ('sysbench','sysbench',1);
Confirm user details and we will save the configuration to disk:
Admin> SELECT username,password,active,default_hostgroup,default_schema,max_connections,max_connections FROM mysql_users;
+----------+----------+--------+-------------------+----------------+-----------------+-----------------+
| username | password | active | default_hostgroup | default_schema | max_connections | max_connections |
+----------+----------+--------+-------------------+----------------+-----------------+-----------------+
| sysbench | sysbench | 1      | 1                 | NULL           | 10000           | 10000           |
+----------+----------+--------+-------------------+----------------+-----------------+-----------------+
1 row in set (0.00 sec)

Admin>  LOAD MYSQL USERS TO RUNTIME;
Query OK, 0 rows affected (0.00 sec)
Admin> SAVE MYSQL USERS TO DISK;
Query OK, 0 rows affected (0.04 sec)
Admin> SAVE MYSQL SERVERS TO DISK;
Query OK, 0 rows affected (0.30 sec)
Step 5: Configure Query Rule
After setting up we need to define which host group should get the select query and which should get written. so to do this we need to run the below commands.
To send all SELECT queries on the slave ( based on Regex ).
Admin> INSERT INTO mysql_query_rules (active, match_digest, destination_hostgroup, apply) VALUES (1, '^SELECT.*', 1, 0);
Query OK, 1 row affected (0.00 sec)
To send read and write queries on master (based on Regex)
Admin> INSERT INTO mysql_query_rules (active, match_digest, destination_hostgroup, apply) VALUES (1, '^SELECT.*FOR UPDATE', 0, 1); Query OK, 1 row affected (0.00 sec)
and write an update on the Disk with the below commands
Adminl> LOAD MYSQL QUERY RULES TO RUNTIME;
Query OK, 0 rows affected (0.00 sec)

Admin> SAVE MYSQL QUERY RULES TO DISK;
Query OK, 0 rows affected (0.08 sec)
This is all you need to configure ProxySQL and now you just have to tell your application to communicate with the ProxySQL host
I hope you like this article and I would love to answer your question. in the next article, we will explore ProxySql monitoring, configuration status, and its tests.


Trending now