Contact Us
Learn To Install, Run And Delete Applications Inside Docker Containers – Part 4
In the tutorial, we will learn to perform some important task like Install, Run and Delete Applications Inside Docker Containers. Here we will use most of the commands which were used in PART 3A and Part 3B.
Just in case, if you did miss Previous tutorials regarding Docker , You can read here:
Part 1: What Is Docker And Concept Of Containers With Virtualization?
Part 2: How To Install Docker On CentOS/RHEL 6/7? And Learn Docker HUB Registration
Part 3A: Getting Familiar With Docker Commands Docker Terms: Docker – Part 3 A
Part 3B: Getting Familiar With Docker Commands Docker Terms: Docker – Part 3 B
Scenario :
Host OS: CentOS 7 x86_64
Host IP: 192.168.1.188
RAM: 4GB memory,
Network Port: 1GB/s
HDD: 1000GB of disk space.
In this Article, we will run a CentOs based Docker container and we will install Apache Web server. We will also commit these changes to the container. In short, we will Docker container into a new image, remove a container and run an Apache web server inside a container.
So Let’s Start
1. Start Container
First, start the container and with the help of the following command get the ContainerID
[root@localhost ~]# docker run -it centos /bin/bash   ------------ You Started Container
[root@7d81872f6a2b /]# exit      ------------ Exit Container
exit
[root@localhost ~]# docker ps -l ----------- Get ContainerID
CONTAINER ID IMAGE    COMMAND    CREATED                  STATUS                                PORTS    NAMES
7d81872f6a2b      centos    "/bin/bash"     About a minute ago   Exited (0) 7 seconds ago                    desperate_kare
As you have got a ContainrID but as you can see it’s in Exited State.
2. Install A Service In Container
To install a service or the packages we need to start this container and get attached to it. We get access inside container we can do lots of work. For this example, we will install Apache Deamon.
First Start The Docker Container Using Container ID
[root@localhost ~]# docker start 7d81872f6a2b
7d81872f6a2b
[root@localhost ~]# docker ps -l    ----------- Get ContainerID
CONTAINER ID      IMAGE    COMMAND          CREATED             STATUS       PORTS    NAMES
7d81872f6a2b      centos   "/bin/bash"     About 2 minute ago   Up 7 seconds         desperate_kare
Now As you can see Docker Container has started and now we will do our service installation.
[root@localhost ~]# docker attach 7d81872f6a2b
[root@7d81872f6a2b /]#  ----------This Shows You are connected with Container
[root@7d81872f6a2b /]# yum install httpd -y
Loaded plugins: fastestmirror, ovl
Determining fastest mirrors
* base: mirror.nbrc.ac.in
* extras: mirror.nbrc.ac.in
* updates: mirror.nbrc.ac.in
Resolving Dependencies
--> Running transaction check
---> Package httpd.x86_64 0:2.4.6-45.el7.centos.4 will be installed
--> Processing Dependency: httpd-tools = 2.4.6-45.el7.centos.4 for package: httpd-2.4.6-45.el7.centos.4.x86_64
--> Processing Dependency: system-logos >= 7.92.1-1 for package: httpd-2.4.6-45.el7.centos.4.x86_64
--> Processing Dependency: /etc/mime.types for package: httpd-2.4.6-45.el7.centos.4.x86_64
--> Processing Dependency: libaprutil-1.so.0()(64bit) for package: httpd-2.4.6-45.el7.centos.4.x86_64
--> Processing Dependency: libapr-1.so.0()(64bit) for package: httpd-2.4.6-45.el7.centos.4.x86_64
---> Package mailcap.noarch 0:2.1.41-2.el7 will be installed
--> Finished Dependency Resolution

Dependencies Resolved

===============================================================================================================================================================================================
Package Arch Version Repository Size
===============================================================================================================================================================================================
Installing:
httpd x86_64 2.4.6-45.el7.centos.4 updates 2.7 M
Installing for dependencies:
httpd-tools x86_64 2.4.6-45.el7.centos.4 updates 84 k
mailcap noarch 2.1.41-2.el7 base 31 k

Transaction Summary
===============================================================================================================================================================================================
Install 1 Package (+5 Dependent packages)

Total download size: 24 M
Installed size: 32 M
Downloading packages:
warning: /var/cache/yum/x86_64/7/base/packages/apr-1.4.8-3.el7.x86_64.rpm: Header V3 RSA/SHA256 Signature, key ID f4a80eb5: NOKEY
Public key for apr-1.4.8-3.el7.x86_64.rpm is not installed
(1/6): apr-1.4.8-3.el7.x86_64.rpm | 103 kB 00:00:00
Public key for httpd-tools-2.4.6-45.el7.centos.4.x86_64.rpm is not installed 0% [ ] 0.0 B/s | 103 kB --:--:-- ETA
(2/6): httpd-tools-2.4.6-45.el7.centos.4.x86_64.rpm | 84 kB 00:00:00
(3/6): mailcap-2.1.41-2.el7.noarch.rpm | 31 kB 00:00:00
(4/6): apr-util-1.5.2-6.el7.x86_64.rpm | 92 kB 00:00:00
(5/6): httpd-2.4.6-45.el7.centos.4.x86_64.rpm | 2.7 MB 00:00:09
-----------------------------------------------------------------------------------------------------------------------------------------------------------------------------------------------
Total 743 kB/s | 24 MB 00:00:33
Running transaction check
Running transaction test
Transaction test succeeded
Running transaction

Installing : httpd-tools-2.4.6-45.el7.centos.4.x86_64 3/6

Installing : mailcap-2.1.41-2.el7.noarch 5/6
Installing : httpd-2.4.6-45.el7.centos.4.x86_64 6/6
Verifying : httpd-tools-2.4.6-45.el7.centos.4.x86_64 4/6
Verifying : httpd-2.4.6-45.el7.centos.4.x86_64 5/6
Verifying : centos-logos-70.0.6-3.el7.centos.noarch 6/6

Installed:
httpd.x86_64 0:2.4.6-45.el7.centos.4

Dependency Installed:
apr.x86_64 0:1.4.8-3.el7 apr-util.x86_64 0:1.5.2-6.el7 centos-logos.noarch 0:70.0.6-3.el7.centos httpd-tools.x86_64 0:2.4.6-45.el7.centos.4 mailcap.noarch 0:2.1.41-2.el7

Complete!
[root@7d81872f6a2b /]# exit
We have Successfully Installed A service Inside The Container.
3. Commit Changes To The Container
As we a have container with Apache installed inside. Now we will commit this container a new Image and we will save this as our new Docker Image. First, We need to get exit from this Container and then follow more steps.
[root@localhost ~]# docker commit 7d81872f6a2b centos-apache
sha256:c260cf77d362b89cc00bed107250166ecd548752d50ef78d5c9dcd0f7c114bdb -- Output
Here, 7d81872f6a2b is Container ID and centos-apache is our new Image. Now we can confirm that we have a new image by the following command.
[root@localhost ~]# docker images
REPOSITORY             TAG    IMAGE ID     CREATED            SIZE
centos-apache          latest c260cf77d362 About a minute ago 327.5 MB
docker.io/hello-world  latest 1815c82652c0 2 weeks ago        1.84 kB
docker.io/centos       latest 3bee3060bfc8 3 weeks ago        192.5 MB
4. Verifying Image With Installed Apache
Now we can test our newly created image and check that all the changes we did commit inside. In this case, Apache service has been installed), so execute the following command in order to generate a new container, and tell us that we have installed Apache
[root@localhost ~]# docker run centos-apache /bin/bash -c "whereis httpd"
httpd: /usr/sbin/httpd /usr/lib64/httpd /etc/httpd /usr/share/httpd
5. Removing A Container
Now we will remove this container because we don’t need it and to do the same, we require contained ID so run following command to get ContainerID and delete that container.
[root@localhost ~]# docker ps -a   -- To Get Container ID
CONTAINER ID IMAGE COMMAND CREATED STATUS PORTS NAMES
95ddcedfbea4  centos-apache "/bin/bash -c 'wherei" 17 seconds ago Exited (0) 10 seconds ago furious_brahmagupta
[root@localhost ~]# docker rm 95ddcedfbea4
6. Running A Sevice Inside Container
Now we have our own image and we want to run Apache server from our new docker image centos-apache and to do that first thing we need to do is to create a new container now along with we will map host-container ports and enter container shell by issuing following command.
[root@localhost ~]# docker run -it -p 81:80 centos-apache /bin/bash
[root@3a5c5be3e947 /]# httpd &
[1] 15    -----------  Press CTRL+p then CTRL+q
-p option is to open host port to container port( host port can be arbitrary and no other host services should listen to it), the container port must be exactly the port that the inside daemon is listening to.
Ctrl-p + Ctrl-q keys are used to detach container from console.
Now we can check work and get the state of your running container with following commands
[root@localhost ~]# docker ps
CONTAINER ID IMAGE COMMAND CREATED STATUS PORTS NAMES
3a5c5be3e947 centos-apache "/bin/bash" 9 minutes ago Up 9 minutes 0.0.0.0:81->80/tcp silly_hawking
OR
[root@localhost ~]# netstat -tlpn | grep :81
tcp6 0 0 :::81 :::* LISTEN 9157/docker-proxy-c
7. Check Your Work
In order to visit the page served by the Apache Container, open a browser your LAN and type the IP address of your machine using the HTTP protocol.
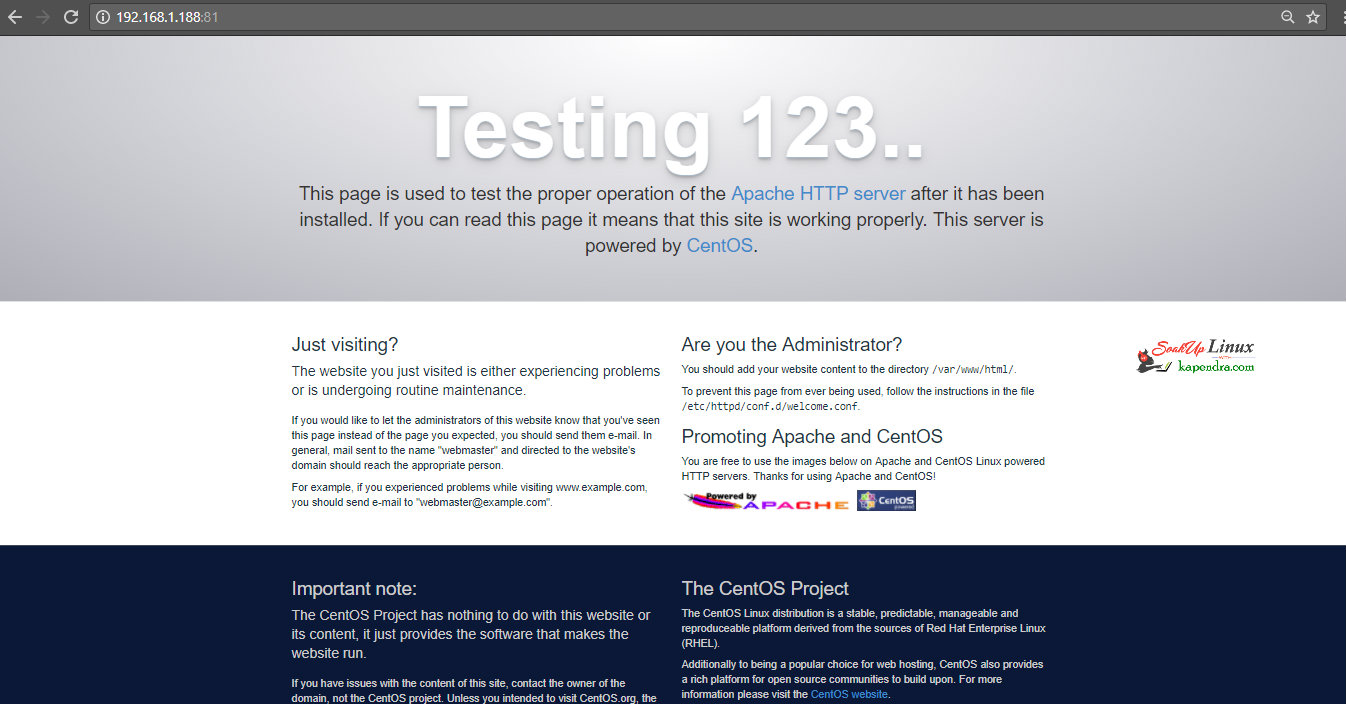
Here You Can see its working on port 81
8. Stop A Container
We have learned most of the basic operation on Docker now this is the final step To stop the container. To do that run the following command followed by container ID or name.
[root@localhost ~]# docker ps ---- Getting Container Name Or ContainerID
CONTAINER ID IMAGE COMMAND CREATED STATUS PORTS NAMES
3a5c5be3e947 centos-apache "/bin/bash" 24 minutes ago Up 24 minutes 0.0.0.0:81->80/tcp silly_hawking
[root@localhost ~]# docker stop silly_hawking  ---- Stopping Container By Name
silly_hawking
[root@localhost ~]# docker ps
CONTAINER ID IMAGE COMMAND CREATED STATUS PORTS NAMES   ---- No Container Is Running
Part 1: What Is Docker And Concept Of Containers With Virtualization?
Part 2: How To Install Docker On CentOS/RHEL 6/7? And Learn Docker HUB Registration
Part 3A: Getting Familiar With Docker Commands Docker Terms: Docker – Part 3 A
Part 3B: Getting Familiar With Docker Commands Docker Terms: Docker – Part 3 B
Watch Video: And Subscribe To My YouTube Channel
Subscribe on Youtube |
In case, if you are having anyone trouble in this tut please let me know by commenting and please share this article with your friends.