Contact Us
How To Install Custom PHP Version On CentOS 5/6/7 ?
When It comes to the LAMP environment sometimes it is required to install a custom version of PHP on your server because every repository has its own default version Package. In my previous tutorial (How to install PHP and How to set up LAMP stack) we used yum.
In this article, we will compile our own PHP version according to need and by the end of this article, you will b able to install any version of PHP(5.6, 5.7 or 7).
Scenario: My Server IP is 192.168.1.188
Custom PHP Version: PHP 5.6
Note: If you are a SUDO user then prefix every command with sudo, like #sudo ifconfig
Step 1: Create a Directory And Installing Development Tools
First, you need to log in and move to your home directory and create a directory for downloading PHP.
# cd ~
# mkdir custom_php
# cd custom_php
# yum install -y gcc glibc glibc-common gd gd-devel make net-snmp openssl-devel libxml2-devel
Step 2: Download PHP version
Now identify the version you want to install from the website click on .tar.gz the link for your desired PHP version now right-click and copy the link address.
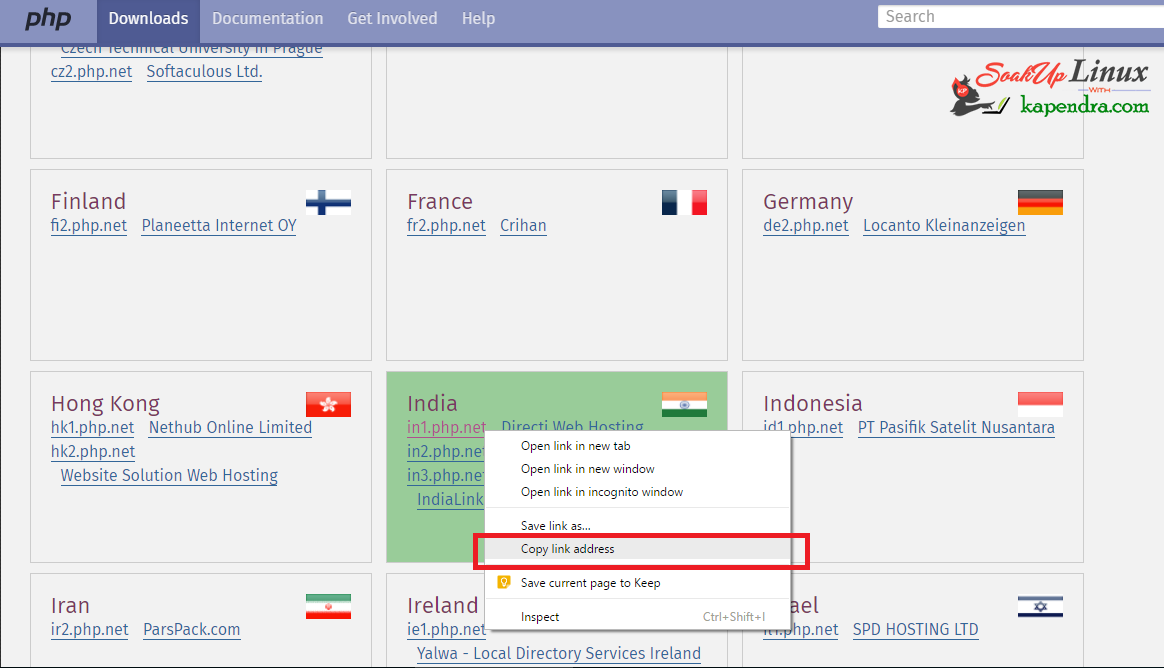
Now Run the following command on Terminal
#wget http://in1.php.net/get/php-5.6.30.tar.gz/from/this/mirror
Your downloaded file will be by the name mirror and don’t forget to check that file is completely by using this command
#md5sum mirror
Step 3: Untar the files
As we have downloaded our desired version in tar.gz so we need to decompress it and rename the uncompressed directory by some simple name for our ease.
#tar -xvzf mirror
#mv php-5.6.30 php56
Step 4: Setting Up Installation Directory
To process further we need a directory to install PHP. In my case, I am installing in /user/local/php56 but you can change this location to your home directory or any other directory you want.
#mv php56/ /usr/local/php56
#cd  /usr/local/php56
Step 5: Installing PHP
Now it is simple and we need to compile this PHP on our server by these simple commands.
# ./configure --prefix=/usr/local/php56
# make
# make install
Step 6: Setting Up Path for PHP
Now to set your custom /usr/local/bin/ directory to your user’s PATH you need to edit your /etc/profile and enter the following:
#vim /etc/profile
.....................
.....................

# Current threshold for system reserved uid/gids is 200
# You could check uidgid reservation validity in

export PATH=/usr/local/php56/bin:$PATH

# /usr/share/doc/setup-*/uidgid file
if [ $UID -gt 199 ] && [ "`id -gn`" = "`id -un`" ]; then
 umask 002
else
.......................
................

save File with :wq!
Run the following command to update your .bash_profile in the current session and log in:
# source /etc/profile
Step 7: Check Your Installation
As you have successfully installed our custom PHP version, we need to verify its version and location of installation
#which php
Output Window will be like:
/usr/local/php56/bin/php
Also, check which version of PHP your shell is using:
#php -v
Output Window:
PHP 5.6.30 (cli) (built: May 20 2017 18:33:30)
Copyright (c) 1997-2016 The PHP Group
Zend Engine v2.6.0, Copyright (c) 1998-2016 Zend Technologies
Watch Video:
YouTube Link
You may also Like


Trending now