Contact Us
How To Install Nagios 4.x Server/Client – Part 1
Nagios is an open-source tool for monitoring servers. when there is a good number of the server then health checks and server monitoring is a headache and Nagios is a good solution for such environment. It’s a lovely Open Source monitoring tool and always keep you updated about server health.
If you are using Nagios you can monitor server hosts on a single platform on your web browser. whenever there is a warning occurring (your setup limit), it shows the warning and sends it to you through mail/SMS accordingly. It helps us to reduce downtime and business losses.
This post will help and instruct you to install Nagios4.0.1 from source (tarball) on RHEL 7.x/6.x/5.x, CentOS 7.x/6.x/5.x and Fedora 24-19 distributions. And it is really easy to set up and 100% effective and time-saving.
Scenario:
Server IP: 192.168.1.188
Nagios: nagios-4.0.1 and nagios-plugins-1.5
Installation Directory: /usr/local/Nagios
Nagios will be accessible at http://IP/nagios or http://localhost/nagios
By default, Nagios Will monitor Your local machine (Disk Usage, CPU Load, Current Users, Total Processes, etc.)
Installation Directory: /usr/local/Nagios
Nagios will be accessible at http://IP/nagios or http://localhost/nagios
By default, Nagios Will monitor Your local machine (Disk Usage, CPU Load, Current Users, Total Processes, etc.)
Step 1: Install Required Packages For compilation
-------------- ON RHEL 7.x/6.x/5.x, CentOS 7.x/6.x/5.x --------------------
[root@kapendra]# yum install -y httpd php gcc glibc glibc-common gd gd-devel make net-snmp
-------------- Fedora 24-19 distributions --------------
[root@kapendra]# dnf install -y httpd php gcc glibc glibc-common gd gd-devel make net-snmp
Step 2: Create Nagios User and Group
Create a new Nagios user and nagcmd group account and set a password.
[root@kapendra]# groupadd nagcmd
[root@kapendra]# useradd -G nagcmd nagios
[root@kapendra]# echo "Your Password" | passwd --stdin nagios
[root@kapendra]# usermod -G nagcmd apache
Step 3: Download Nagios Core 4.4.3 and Nagios Plugin 2.2.1
[root@kapendra]# mkdir /root/nagios; cd /root/nagios
[root@kapendra]# wget https://assets.nagios.com/downloads/nagioscore/releases/nagios-4.4.3.tar.gz
[root@kapendra]# wget https://nagios-plugins.org/download/nagios-plugins-2.2.1.tar.gz
Step 4: Extract Nagios Core and its Plugins
[root@kapendra]# tar -xvzf nagios-4.4.3.tar.gz;tar -xvzf nagios-plugins-2.2.1.tar.gz
After Successful Extraction, remove These files if you want to
[root@kapendra]# rm -rf nagios-4.4.3.tar.gz nagios-plugins-2.2.1.tar.gz
And Your Directory Will look Like this
[root@kapendra nagios]# ll
total 1952
drwxrwxr-x. 18 root root     4096 Aug 20  2015 nagios-4.0.1
drwxr-xr-x. 15 root root     4096 Aug  1 21:58 nagios-plugins-2.1.2
Step 5: Configure Nagios Core
[root@kapendra nagios] cd nagios-4.4.3
[root@kapendra nagios-4.4.3] ./configure --with-command-group=nagcmd
Sample Output
Creating sample config files in sample-config/ ...
*** Configuration summary for nagios 4.0.1 017-04-2017 ***:
General Options:
-------------------------
Nagios executable: nagios
Nagios user/group: nagios,nagios
Command user/group: nagios,nagcmd
Event Broker: yes
Install ${prefix}: /usr/local/nagios
Install ${includedir}: /usr/local/nagios/include/nagios
Lock file: ${prefix}/var/nagios.lock
Check result directory: ${prefix}/var/spool/checkresults
Init directory: /etc/rc.d/init.d
Apache conf.d directory: /etc/httpd/conf.d
Mail program: /bin/mail
Host OS: linux-gnu
IOBroker Method: epoll
Web Interface Options:
------------------------
HTML URL: http://localhost/nagios/
CGI URL: http://localhost/nagios/cgi-bin/
Traceroute (used by WAP): /usr/bin/traceroute
Review the options above for accuracy. If they look okay,
type 'make all' to compile the main program and CGIs.
Now Make Final Hit to make it small (do not forget I am putting semicolon)
[root@kapendra nagios-4.4.3 ]# make all;make install;make install-init;make install-commandmode;
make install-config;make install-webconf
Step 6: Customizing Nagios Configuration
[root@kapendra nagios-4.4.3 ]# vim /usr/local/nagios/etc/objects/contacts.cfg

Sample
###############################################################################
###############################################################################
#
# CONTACTS
#
###############################################################################
###############################################################################
# Just one contact defined by default - the Nagios admin (that's you)
# This contact definition inherits a lot of default values from the 'generic-contact'
# template which is defined elsewhere.
define contact{
contact_name nagiosadmin ; Short name of user
use generic-contact ; Inherit default values from generic-contact template (defined above)
alias Nagios Admin ; Full name of user
email [email protected],[email protected] ; *** CHANGE THIS TO YOUR EMAIL ADDRESS ****
}
Step 7: Install and Configure Web Interface for Nagios
We have already installed Web Interface (make install-webconf) so need to run this but the following are needed
[root@kapendra nagios-4.4.3 ]# htpasswd -s -c /usr/local/nagios/etc/htpasswd.users nagiosadmin
New password:
Re-type new password:
Adding password for user nagiosadmin and restart Nagios and Apache
[root@kapendra ]# service httpd start
Step 8: Compile and Install Nagios Plugin
[root@kapendra]# cd /root/nagios/nagios-plugins-2.2.1
[root@kapendra]# ./configure --with-nagios-user=nagios --with-nagios-group=nagios
[root@kapendra]# make;make install
Step 8: Checking Configuration and Adding service at startup
For CentOS 6:
[root@kapendra]# /usr/local/nagios/bin/nagios -v /usr/local/nagios/etc/nagios.cfg
[root@kapendra]# chkconfig --add nagios
[root@kapendra]# chkconfig --level 35 nagios on
[root@kapendra]# chkconfig --add httpd
[root@kapendra]# chkconfig --level 35 httpd on
[root@kapendra]# service nagios start
For CentOS 7:
[root@test nagios-plugins-2.2.1]# systemctl enable nagios
Created symlink from /etc/systemd/system/multi-user.target.wants/nagios.service to /usr/lib/systemd/system/nagios.service.
[root@test nagios-plugins-2.2.1]# systemctl start nagios
[root@test nagios-plugins-2.2.1]# systemctl start httpd
[root@test nagios-plugins-2.2.1]# systemctl enable httpd
Created symlink from /etc/systemd/system/multi-user.target.wants/httpd.service to /usr/lib/systemd/system/httpd.service.
Step 9: Checking Configuration and Adding service at startup
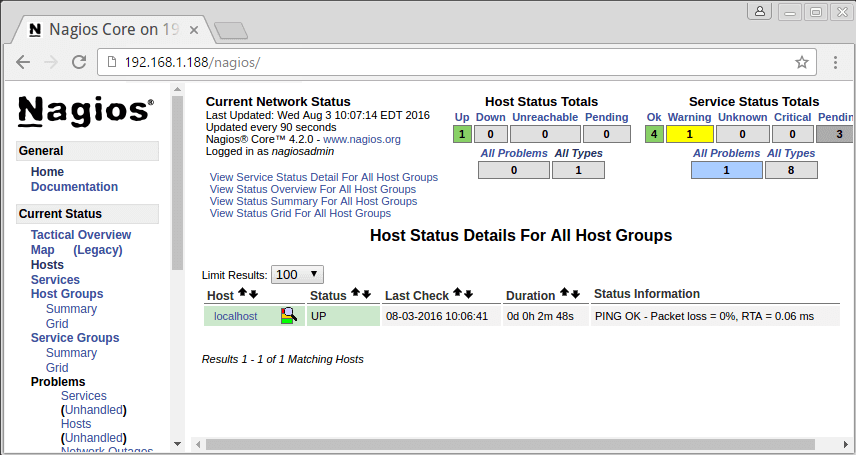
Login Using http://localhot/nagios or http://IP/nagios and provide the username nagiosadmin & your password
Here You Can see The Host
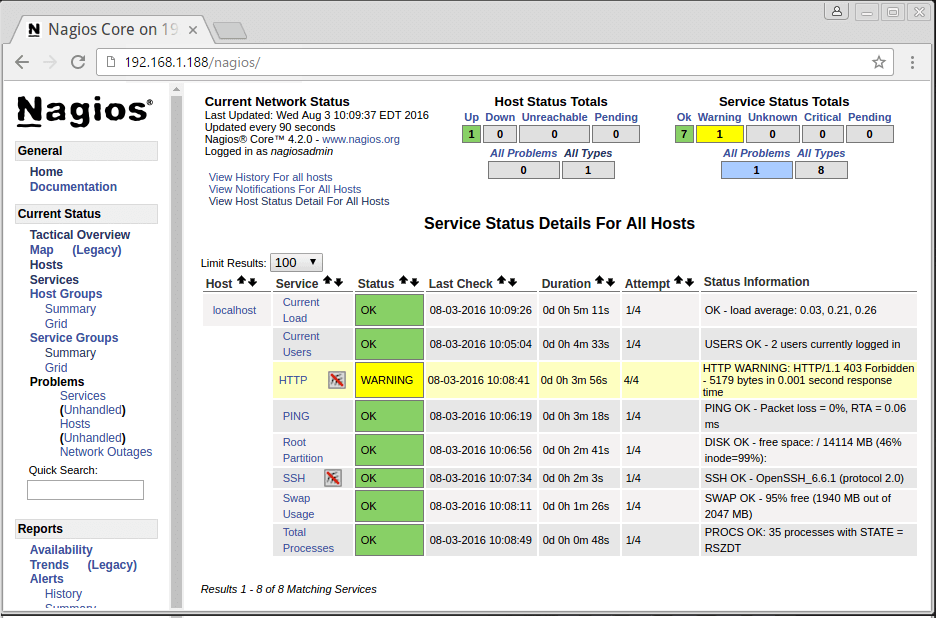
See Services which are Being Monitored


Trending now