Contact Us
How to Install phpMyAdmin on CentOS/RHEL 7/6/5 and Fedora
phpMyAdmin is a web-based client for managing Mysql and MariaDB. This program is written in PHP itself. This I a good tool for all the users who are not very friendly with the command line and needs to manage database graphically. phpMyAdmin has been translated into almost 72 different languages across the world. Now just to get this engage a wide range of people and supports both LTR and RTL languages.
Features of phpMyAdmin:
-
- Friendly web interface
- Supported most of the MySQL features:
- Browse and drop databases, tables, views, fields, and indexes.
- Create, copy, drop, rename and alter databases, tables, fields, and indexes
- Manage MySQL users and their privileges
- Import data from CSV and SQL
- Export data to various formats: CSV, SQL, XML, PDF, ISO/IEC 26300 – OpenDocument Text and Spreadsheet, Word, LATEX, and others
- Administering multiple servers
Here I am going to tell you the best and smartest way to get phpMyAdmin install, up, and running on CentOS/RHEL Systems.
Prerequisites:
Apache, PHP, and MySQL are already installed on the server. In short, we need LAMP environment on the system. If you don’t have LAMP you can do this by reading: How To Set Up LAMP Environment With Apache MySql And PHP
Scenario:
My Server IP: 192.168.1.188
OS: CentOS/RHEL/Fedora 5/6/7
Note: If you are a SUDO user then prefix every command with sudo, like #sudo ifconfig
Step 1: Enable Remi Repository
phpMyAdmin most updated package is available under Remi repository. Install it in your system using following commands.
CentOS/RHEL 7:
# rpm -Uvh http://rpms.famillecollet.com/enterprise/remi-release-7.rpm

CentOS/RHEL 6:
# rpm -Uvh http://rpms.famillecollet.com/enterprise/remi-release-6.rpm

CentOS/RHEL 5:
# rpm -Uvh http://rpms.famillecollet.com/enterprise/remi-release-5.rpm

Fedora 20:
# rpm -Uvh http://rpms.famillecollet.com/remi-release-20.rpm
Step 2: Install phpMyAdmin
After adding Remi repository, install phpMyAdmin using yum package manager. All the dependencies will automatically be installed.
# yum --enablerepo=remi install phpMyAdmin
Step 3: Configure phpMyAdmin
phpMyAdmin by default allowed to access from localhost only. If you want to make it accessible from remote computers do following changes for making phpMyAdmin accessible within a global network.
# mv /usr/share/phpMyAdmin /var/www/html/phpmyadmin
# chmod -R 775 /var/www/html/phpmyadmin/
# mv /etc/httpd/conf.d/phpMyAdmin.conf /etc/httpd/conf.d/phpMyAdmin.conf-bak
Now, restart Apache service to reload new settings.
# service httpd restart
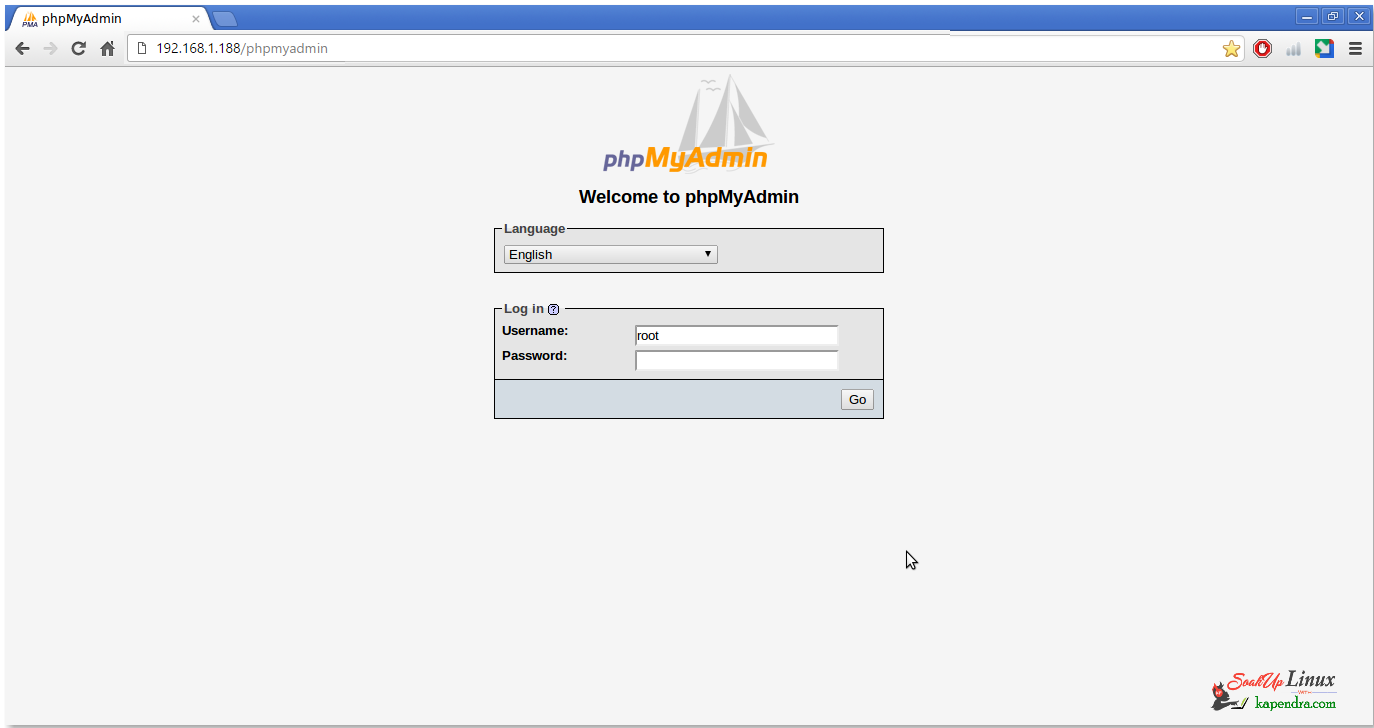
Step 4: Access phpMyAdmin in Browser
Now you can access phpMyAdmin in the browser using the following URL. Change to “domainname.com” eg. test.exapmle.com with your server IP/FQDN.
http://192.168.1.188/phpmyadmin/

Login Details: Use MySQL username and password (You Already have)
Congratulation’s You have successfully installed phpMyAdmin. Using single phpMyAdmin we can manage multiple MySQL servers by adding multiple remote MySQL servers.
For More understanding Watch This Video:
Subscribe on Youtube |
|


Trending now