Contact Us

How To Setup TigerVNC To Connect Remote Server Graphically On RHEL/CentOS 7?
In this tutorial, we will learn how to install and configure a TigerVNC server on CentOS 7 but before moving to future let’s know what is VNC
What is VNC?
VNC stands for Virtual Network Computing running on default port 5900. VNC is a platform-independent protocol which facilitates a user to connect to a remote system or computer graphically. In simple words, you get a remote desktop like windows have a remote desktop in a GUI mode.
All the command, mouse and keyboard strokes are transmitted over the network to the remote computer.it is available for OS X, Linux, and other operating systems.
Scenario:
Host OS: CentOS/RHEL 7 (Minimal Install)
Host IP: 192.168.1.18
RAM: 4GB Memory
Home Dir: /home/vncuser
Note: If you are a SUDO user then prefix every command with sudo, like #sudo ifconfig
So Let’s Start
Step 1: Create A User Account
First, we need to create a user account. This user account will be used for connecting our CentOS servers remotely by VNC clients. Run the below command to create a user
[root@localhost ~]# useradd -c "User vncuser - for VNC Access" vncuser
[root@localhost ~]# passwd vncuser
Changing password for user vncuser.
New password:
Retype new password:
passwd: all authentication tokens updated successfully.
Step 2: Install GUI On VNC Server
To get connect with a remotely we need a GNOME or GUI install on the server and a per our scenario we have server with minimal install so we must run the following command to install GNOME
[root@localhost ~]# yum groupinstall "GNOME Desktop"
This can take a few minutes and Once the package group is installed, reboot the server using below command
[root@localhost ~]# reboot
Note: if you already have a GUI installed on your system then you may skip this step
Troubleshooting(Sometimes Only)
After reboot, if your Server Stuck at below given screen so follow the steps given below
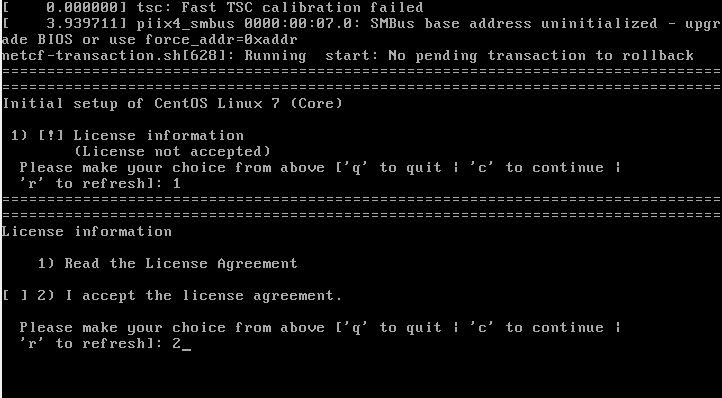
Press 1 (license read),
Then 2 (accept license),
Then C (to continue).
You may have to press C two or more times. As shown in above image
Step 3: Install TigerVNC Server
TigerVNC is the open source software and we will use the same that will allow us to make a remote desktop connection. So, run the following command to install
[root@localhost ~]# yum install tigervnc-server
Now we have successfully installed VNC server GNOME desktop installed.
Step 4: Configuring VNC Client/User
When you are using VNC then every user connecting via VNC will start a new service or instance. VNC doesn’t run as one single process.
So, now we will start a new instance of VNC server for a user. So, let’s make a copy of /lib/systemd/system/[email protected] file to create our user service file using below command.
[root@localhost ~]# cp /lib/systemd/system/[email protected] /etc/systemd/system/vncserver@:4.service
Now let’s edit the file to create separate service for our client.
[root@localhost ~]# vim /etc/systemd/system/vncserver@:4.service
now look for the [Service] section and replace <USER> with vncuser and add the -geometry 1280×1024 clause at the end of the ExecStart parameter. After editing your file should look like below file
# The vncserver service unit file
#
# Quick HowTo:
# 1. Copy this file to /etc/systemd/system/[email protected]
# 2. Edit /etc/systemd/system/[email protected], replacing <USER>
# with the actual user name. Leave the remaining lines of the file unmodified
# (ExecStart=/usr/sbin/runuser -l <USER> -c "/usr/bin/vncserver %i"
# PIDFile=/home/<USER>/.vnc/%H%i.pid)
# 3. Run `systemctl daemon-reload`
# 4. Run `systemctl enable vncserver@:<display>.service`
#
# DO NOT RUN THIS SERVICE if your local area network is
# untrusted! For a secure way of using VNC, you should
# limit connections to the local host and then tunnel from
# the machine you want to view VNC on (host A) to the machine
# whose VNC output you want to view (host B)
#
# [user@hostA ~]$ ssh -v -C -L 590N:localhost:590M hostB
#
# this will open a connection on port 590N of your hostA to hostB's port 590M
# (in fact, it ssh-connects to hostB and then connects to localhost (on hostB).
# See the ssh man page for details on port forwarding)
#
# You can then point a VNC client on hostA at vncdisplay N of localhost and with
# the help of ssh, you end up seeing what hostB makes available on port 590M
#
# Use "-nolisten tcp" to prevent X connections to your VNC server via TCP.
#
# Use "-localhost" to prevent remote VNC clients connecting except when
# doing so through a secure tunnel. See the "-via" option in the
# `man vncviewer' manual page.

[Unit]
Description=Remote desktop service (VNC)
After=syslog.target network.target

[Service]
Type=forking
# Clean any existing files in /tmp/.X11-unix environment
ExecStartPre=/bin/sh -c '/usr/bin/vncuser -kill %i > /dev/null 2>&1 || :'
ExecStart=/usr/sbin/runuser -l vncuser -c "/usr/bin/vncserver %i -geometry 1280x1024"
PIDFile=/home/vncuser/.vnc/%H%i.pid
ExecStop=/bin/sh -c '/usr/bin/vncserver -kill %i > /dev/null 2>&1 || :'

[Install]
WantedBy=multi-user.target
Now save and exit the file using :wq!
Step 5: Start Service
Run the following commands to reload the systemd daemon an enabling vncserver to get started after every reboot
[root@localhost ~]# systemctl daemon-reloadsystemctl
[root@localhost ~]# systemctl enable vncserver@:4.service
Step 6: Configuring Your Firewall
Now if you have a running firewall service on your server then you must follow this step else you may skip if iptables and firewall are down/not running on your system. You may check the status using command
[root@localhost ~]# firewall-cmd --state
running
The output if the firewall is running so Now we will allow VNC traffic through ports 5904, 5905only. so run the following command to allow 5904 and 5905(if looking for one more port)
[root@localhost ~]# firewall-cmd --permanent --zone=public --add-port=5904-5905/tcp
Success
Now Reload the firewall:
[root@localhost ~]# firewall-cmd --reload
Success
Step 7: Setup VNC Passwords
Now we only have to setup VNC password, to do that the users(vncuser) have to login into another terminal to the CentOS 7 server via vncuser.
[root@localhost ~]# ssh [email protected] – (Your Server IP)
and execute the following command and you will be prompted for a password so type new your password (it’s not your Linux user password so chose a different one)
[root@localhost ~]# vncserver
You will require a password to access your desktops.
Password:
Verify:
Warning: localhost.localdomain:4 is taken because of /tmp/.X11-unix/X4
Remove this file if there is no X server localhost.localdomain:4
xauth: file /root/.Xauthority does not exist
New 'localhost.localdomain:6 (root)' desktop is localhost.localdomain:6
Creating default startup script /root/.vnc/xstartup
Starting applications specified in /root/.vnc/xstartup
Log file is /root/.vnc/localhost.localdomain:6.log
Well, you will notice many files are being created in the home directory
Now get back to your main terminal session(root) and run the following command
[root@localhost ~]# systemctl daemon-reload
[root@localhost ~]# systemctl restart vncserver@:4.service
With Ths last command executed you have successfully setup VNC server and in next part, we will learn how to connect VNC server using the VNC client.


Trending now