Contact Us

How To Install WordPress With Nginx ON RHEL/CentOS 6/7 & Fedora?
Introduction To WordPress
WordPress, one of the most in use CMS (Content Management System) system for websites creation. It was developed using MySQL and PHP. It was introduced in the year 2003 and now it’s getting popular day by day because its plugins are available in a mass quantity. With the evolution of web servers, Apache and NGINX WordPress is also flourishing.
So, here we are for How to Install WordPress with NGINX on RHEL/CentOS 6/7 and Fedora? and By the end of this article, we will get aware of setting up WordPress with NGINX/MySQL/MariaDB/PHP
Scenario:
- Server IP is 168.1.188
- Up and Running MySQL –Read How to SetUP MySQL Server 5.5
- Up and Running NGINX –Read How to SetUp NGINX Server
- Up and Running PHP –Read How to Setup Custom PHP or PHP 5.4
Note: If you are a SUDO user then prefix every command with sudo, like #sudo ifconfig
In short, ALL we need is an up and running LEMP environment. LEMP is an environment with running Linux, Nginx, MySQL, and PHP. If you want to know about LAMP(with Apache) you can Read what is LAMP environment and how to set up LMAP environment?
Here is a quick SetUp for LEMP environment.
Looking for WordPress with Apache Read Now: – How To Install WordPress With Apache On RHEL/CentOS 6/7 And Fedora?
Let’s start
Step 1: Setting UP WordPress Installation Directory
Here we are setting up WordPress directory in /var/www/html and if you want to change this location you at change it accordingly as per your need.
# mkdir -p /var/www/html/{wp_test,logs}
# chown -R nginx:nginx /var/www/html/logs
# chmod -R 775 /var/www/html/logs
Step 2: Get WordPress
Now, we need to download the WordPress tarball and required to extract the WordPress files for the further process. Use the following command to do the same.
# cd /var/www/html/
# wget http://wordpress.org/latest.tar.gz
# tar -xvzf latest.tar.gz -C /var/www/html/wp_test --strip-components=1
# rm -rf latest.tar.gz
# chmod -R 775 wp_test
# chown -R nginx:nginx /var/www/html/wp_test
Step 3: Creating MySQL user and Database For WordPress
We need a database for up and running WordPress and a database user which will interact with the database for WordPress. Use the following series of command to login in database and to create database and MySQL user
# mysql -u root -p
mysql>CREATE DATABASE wp_db;
Query OK, 1 row affected (0.00 sec)
Now, we will create a new user. You can replace the name of database and password, with your preferences.
mysql >CREATE USER 'wp_user'@'localhost' identified by "password";
Query OK, 0 rows affected (0.00 sec)
Note: If you already have a user and want to change password you may use the following command
mysql>SET PASSWORD FOR 'wp_user'@'localhost'= PASSWORD("password");
Query OK, 0 rows affected (0.00 sec)
As we have our user and database created now let’s grant all required privileges and permissions
mysql>GRANT ALL PRIVILEGES ON wp_db.* TO 'wp_user'@'localhost';
Query OK, 0 rows affected (0.00 sec)
Now refresh MySQL with following command and exit
mysql>FLUSH PRIVILEGES;
Query OK, 0 rows affected (0.00 sec)
mysql>exit
Note: Highlighted values will be used later so please use accordingly and do as per your need. Also, if there is any problem in setting up mysql server read: – How to SetUP MySQL Server 5.5
Step 4: Creating VirtualHost For WordPress in Nginx
It is assumed that you have a running Nginx server on your server. If not, then follow How To Setup Nginx Server. now we have to configure our nginx server for ti WordPress installation. It’s a bit different for setting up for Apache. Use the following command to do the same.
# cd /etc/nginx/conf.d
Next, create Nginx VirtualHost file for WordPress.
# vim /etc/nginx/conf.d/wp_test.conf
Add the following content to vim /etc/nginx/conf.d/wp_test.conf
server {
server_name wp_test;   #you may put Ip if using IP method
access_log /var/www/html/logs/access.log;
error_log /var/www/html/logs/error.log;
root /var/www/html/wp_test;
location / {
index index.php;
}
# Disable favicon.ico logging
location = /favicon.ico {
log_not_found off;
access_log off;
}
# Allow robots and disable logging
location = /robots.txt {
allow all;
log_not_found off;
access_log off;
}
# Enable permalink structures
if (!-e $request_filename) {
rewrite . /index.php last;
}
# Handle php requests
location ~ \.php$ {
include /etc/nginx/fastcgi_params;
fastcgi_pass  127.0.0.1:9000;
fastcgi_index index.php;
fastcgi_param SCRIPT_FILENAME /var/www/html/wp_test$fastcgi_script_name;
}
# Disable static content logging and set cache time to max
location ~* \.(js|css|png|jpg|jpeg|gif|ico)$ {
expires max;
log_not_found off;
}
# Deny access to htaccess and htpasswd files
location ~ /\.ht {
deny  all;
}
}
Step 5: Disable SELinux
To get this installation done you need to disable SELinux and there are two methods.
Method 1 For Temporary Disable (Recommended)
# setenforce 0
# getenforce
Now it should be in permissive mode.
Method 2 For Permanent Disable (Need a Reboot – Less Recommended)
 #vim /etc/sysconfig/selinux

SELINUX=disabled
save and write quit file :wq!
Note: you will be required to reboot server for this permanent disable #Init 6 (reboot system/server)
After reboot, it should show disabled after hitting command #getenforce
Step 6: Host File Change (Skip This Step Using Ip Method)
Now exit /etc/hosts file and append the following line and save it
#vim  /etc/hosts
127.0.0.1  wp_test
Step 7: Setting up WordPress Installation
This is the key part of getting WordPress installation done. Make sure to make a copy of the default configuration file then make any changes. This configuration file is present in WordPress directory
#cd /var/www/html/wp_test
# cp wp-config-sample.php wp-config.php
Then open the WordPress configuration file:
#vim wp-config.php
You will see content like this and make your changes to the following which I have highlighted.
// ** MySQL settings - You can get this info from your web host ** //
/** The name of the database for WordPress */
define('DB_NAME', 'wp_db');
/** MySQL database username */
define('DB_USER', 'wp_user');
/** MySQL database password */
define('DB_PASSWORD', 'password');
Write and quit the file using :wq!
Step 8: Restart Services and Review Installation
We have successfully done our steps for WordPress for nginx and before testing, we need to restart few services to get our changes in effect and making those service available current run levels. Use the following series of command to do so
For On CentOs/RHEL 7 and Fedora 22 and above:
# systemctl restart nginx.service
# systemctl enable mariadb.service
# systemctl enable nginx.service
For RHEL/CentOS 6 and Fedora 15-21:
# service nginx restart
# chkconfig mysqld on
# chkconfig nginx on
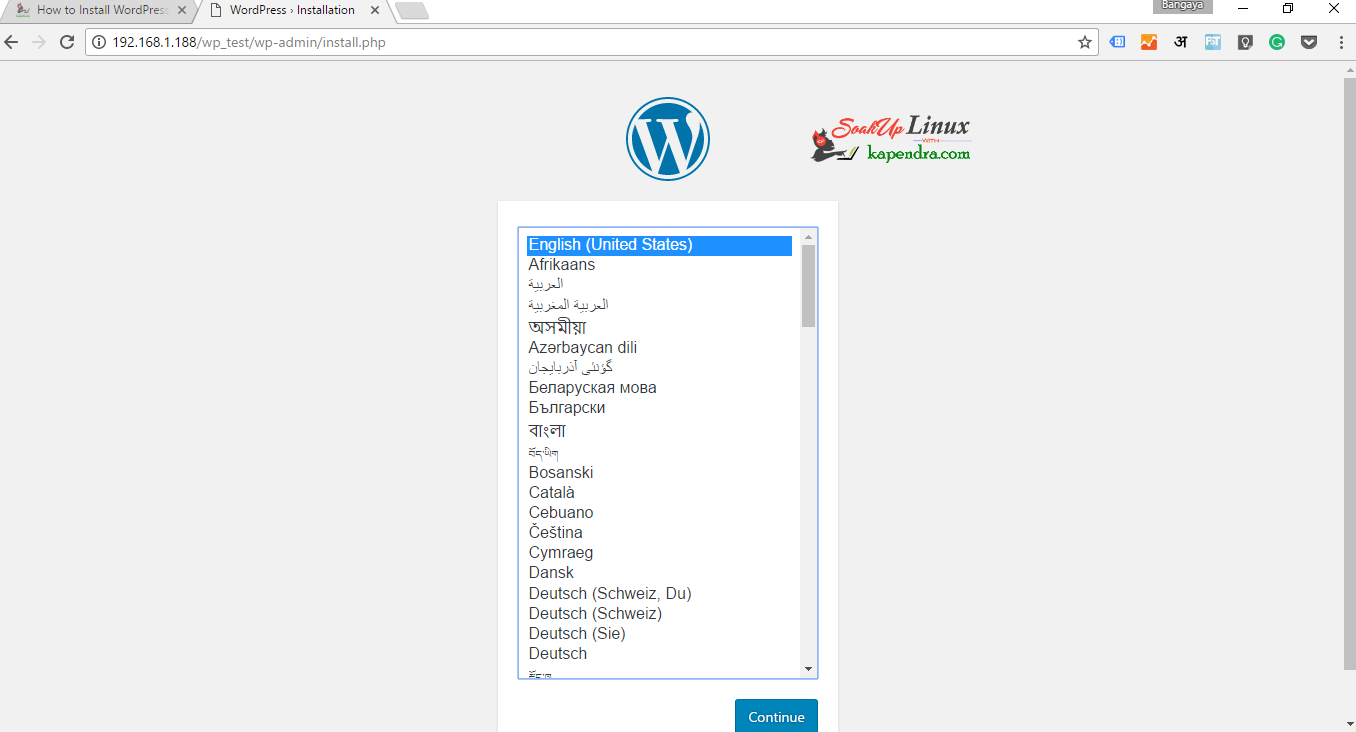
Now, Open your browser and type any of the following address as per your setting you chose above. I have done my installation using IP address so I will use http://192.168.1.188/wp_test
http://localhost/wp_test (If System Is LocalHost)
http://your-ip/wp_test (If WordPress running on IP)
If everything goes right then you will be prompted for this
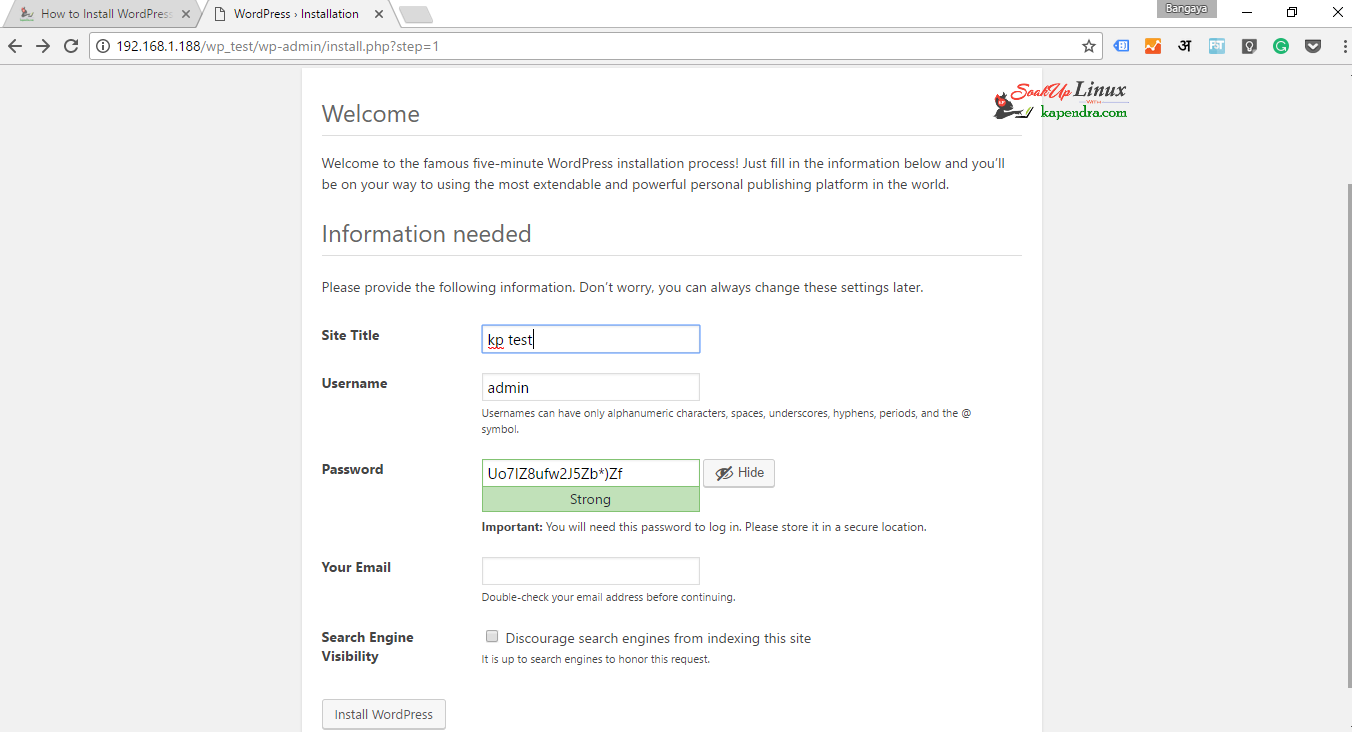
Now fill all the detailed like Site Title, Admin User, Admin Password, and Enter Your E-Mail and then hit Install button.
And you will have a site running on WordPress you may login into WordPress dashboard using
http://localhost/wp_test/wp-login/ (If system is Local)
http://your-ip/wp_test/wp-login/ (id WordPress running on IP)
Watch Video: And Subscribe To My Youtube channel
Subscribe on Youtube |
|
In case, if you are having anyone trouble in this tut please let me know by commenting and please share this article with your friends.


Trending now