Contact Us

How To Scan Your Web Servers For Malware With ISPProtect On CentOS/RHEL 6/7
With the advancement of digitization in the world along with India, every day lots of websites are coming up and these apps, websites data are hosted on web servers and therefore security is a big concern. In today’s scenario, most the websites are the result of CMS system like WordPress, Joomla, Drupal, Magento etc.
Now every day there are lots servers attacked with malware. These attackers exploit system flaws and infect the system with malware and because of such activities, it is recommended to do sanity checks on regular basis.
ISPProtect scans for malware in website files and CMS systems like WordPress, Joomla, Drupal etc and by the end of this article, we will get aware of setting up ISPProtect
Scenario:
- My Server IP is 168.1.188
- OS – CentOS/RHEL 6/7
- PHP 5.4 preinstalled
Note: If you are a SUDO user then prefix every command with sudo, like #sudo ifconfig
ISPProtect Searching Area
- Signature-based malware scanner.
- Heuristic malware scanner.
- Scan outdated CMS systems installation dir
- Scan Outdated WordPress plugins of the whole server.
- Scan MySQL databases for malicious content.
Note: ISPProtect requires PHP and it’s not free software but its free trial can be used to clean an infected system.
Step 1: Install ISPProtect
As mentioned earlier ISPProtect requires PHP and if PHP is not installed you can learn to install PHP. Now yu can install ISPProtect using following command
# cd /tmp
# wget http://www.ispprotect.com/download/ispp_scan.tar.gz
# tar -xvzf ispp_scan.tar.gz
# rm -f ispp_scan.tar.gz
# mkdir /usr/local/malwarescan
# mv ispp_scan /usr/local/malwarescan
# chown -R root:root /usr/local/ispp_scan
# chmod -R 750 /usr/local/ispp_scan
# cd /usr/local/malwarescan
# ln -s /usr/local/malwarescan/ispp_scan /usr/local/bin/ispp_scan
Step 2: Start Scan
Now we have successfully installed ISPProtect and made a soft link in /usr/local/bin for using it as a command in the whole system. to start scan run following command and follow the procedure
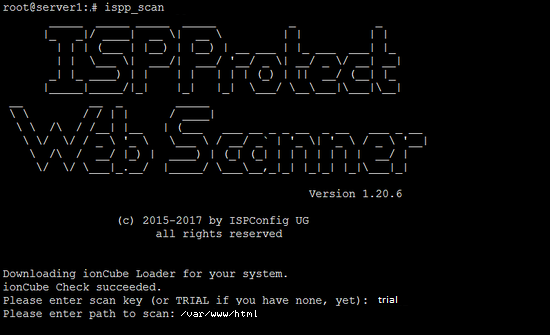
#ispp_scan
First, the scanner will check for updates and prompt you for the key (you just need to enter the word “trial” ) soon after it will ask for your websites location i.e. /var/www/html in most of the cases. but you should enter your location.
Please enter scan key: <-- trial
Please enter path to scan: <-- /var/www/html
Now it will start the scan and will start showing you infected file at the end of the scan and these results get stored in log file present in the ISPProtect installation directory.
Malware => /usr/local/malwarescan/found_malware_20170616562429.txt
Wordpress => /usr/local/malwarescan/software_wordpress_20170616562429.txt.txt
Joomla => /usr/local/malwarescan/software_joomla_20170616562429.txt.txt
Drupal => /usr/local/malwarescan/software_drupal_20170616562429.txt.txt
Mediawiki => /usr/local/malwarescan/software_mediawiki_20170616562429.txt.txt
Contao => /usr/local/malwarescan/software_contao_20170616562429.txt.txt
Magentocommerce => /usr/local/malwarescan/software_magentocommerce_20170616562429.txt.txt
/usr/local/malwarescan/software_mysqldumper_20170616562429.txt.txt
Starting scan level 1 ...
Step 3: Check Output and Set CRON
After the successful finish of scan you will see a list of several files and now you can figure out these infected files. To take a regular check you may set a Cron to do a malware check automatically for you. Do this follow these steps.
#crontab -e
15 00 * * * /usr/local/malwarescan/ispp_scan --update && /usr/local/malwarescan/ispp_scan --path=/var/www/html --email-results=youemail@domain-name --non-interactive --scan-key=trial
now save CRON with :wq!
Note: Do not forget to change your email id to get a detailed report.
Some Useful Information
1. Exclude files and logs from scan
#ispp_scan --exclude and --exclude-from arguments, e. g. to exclude all PNG files, type --exclude=”*.png” (case-sensitive)
#ispp_scan --exclude=”**/log/*.log”
2. Local whitelisting
You can add a file to the white list
#ispp_scan --whitelist=/path/of/file.php
By default, the white list is stored in ~/.ispp_scan.whitelist .You can change this path by adding the whitelist-path argument:
#ispp_scan --whitelist-path=/home/user/.ispprotect.wl --whitelist=/path/to/your/file.php
3. Ignoring malware types
#ispp_scan --ignore={ISPP}suspect.eval.base64
This would ignore all malware named {ISPP}suspect.eval.base64 (not recommended, of course)
Watch Video:
Coming Soon
You Must Read:
- Which one Is Better Apache Or Nginx?
- How To Install WordPress 4.7 With Nginx ON RHEL/CentOS 6/7 & Fedora
- How To Install Nagios 4.X Server/Client – Part 1
- How To Install PHP 5.6 Using YUM ON CentOS/RHEL 6/7?