Contact Us
How to Install Kubernetes on CentOS/RHEL k8s: Part-3
In this article, we will learn to set up and install the Kubernetes cluster with two worker nodes. We have already discussed Kubernetes in our previous articles. If you have missed it then you may go back on these links to know about Kubernetes :
Understanding Kubernetes Concepts RHEL/CentOs K8s Part-1
Understanding Kubernetes Concepts RHEL/CentOs k8s: Part-2
But in short, Kubernetes is a container orchestration program and it is an OpenSource project by Google donated to “Cloud Native Computing foundation”
As we know that there are master nodes and worker nodes in Kubernetes. In this article, we will also know the use of some commands like kubeadm and kubectl.
There are several ways to implement Kubernetes and it’s totally about your need and I have listed a few of the methods
- Minikube – It is a single node kubernetes cluster and good for development and testing
- Kops (On AWS)- Multimode kubernetes and Easy to deploy as AWS take care of most of the things
- Kubeadm -Multi-Node Cluster in our own premises
- GCP Kubernetes – Almost same as AWS
Well in our scenario we are going to deploy Kubernetes using kubeadm and set up into our own premise.
Scenario:
Host OS: CentOS/RHEL 7
Master Node: 192.168.56.101
Worker Node-1: 192.168.56.102
Worker Node-2: 192.168.56.103
RAM: 4GB Memory
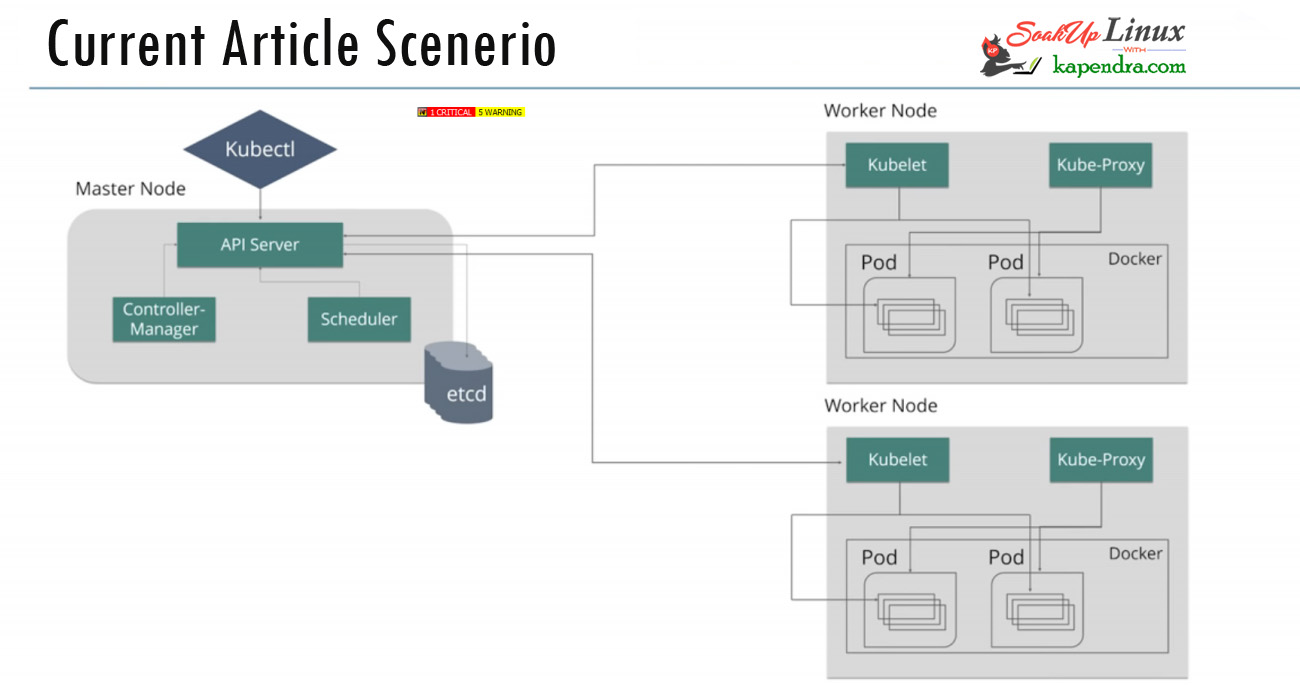
Minimum Requirement for Machines
Master: 2 Core CPU 4GB RAM
Node: 1 CPU 4 GB RAM
Note: If you are a SUDO user then prefix every command with sudo, like #sudo ifconfig
As I have mentioned about machine requirements and I will be using all three machines with minimal installation on CentOs 7. One server will act as a master node and rest two servers will be the minion or worker nodes
On the Master Node following components will be installed
- API Server – It provides kubernetes API using Json / Yaml over HTTP, states of API objects are stored in etcd
- Scheduler – A master node program that performs scheduling tasks like launching containers in worker nodes based on available resources
- Controller Manager – the main job of the controller manager is to monitor replication controllers and create pods to maintain the desired state.
- etcd – It is a Key value pair database. It stores configuration data of cluster and cluster state.
- Kubectl utility – It is a command-line utility that connects to API Server on port 6443. It is used by administrators to create pods, services etc.
On Worker Nodes following components will be installed
- Kubelet – An agent on the worker node, connects to Docker and takes care of creating, starting, deleting containers.
- Kube-Proxy – It routes the traffic to appropriate containers based on the IP address and port number of the incoming request. Basically does the port translation.
- Pod – Pod can be defined as a multi-tier or group of containers that are deployed on a single worker node or Docker host.
I have broken this installation process into three Section
- Section 1. Command to run on BOTH
- Section 2. Command to run on master only
- Section 3. Command to run on the slave only
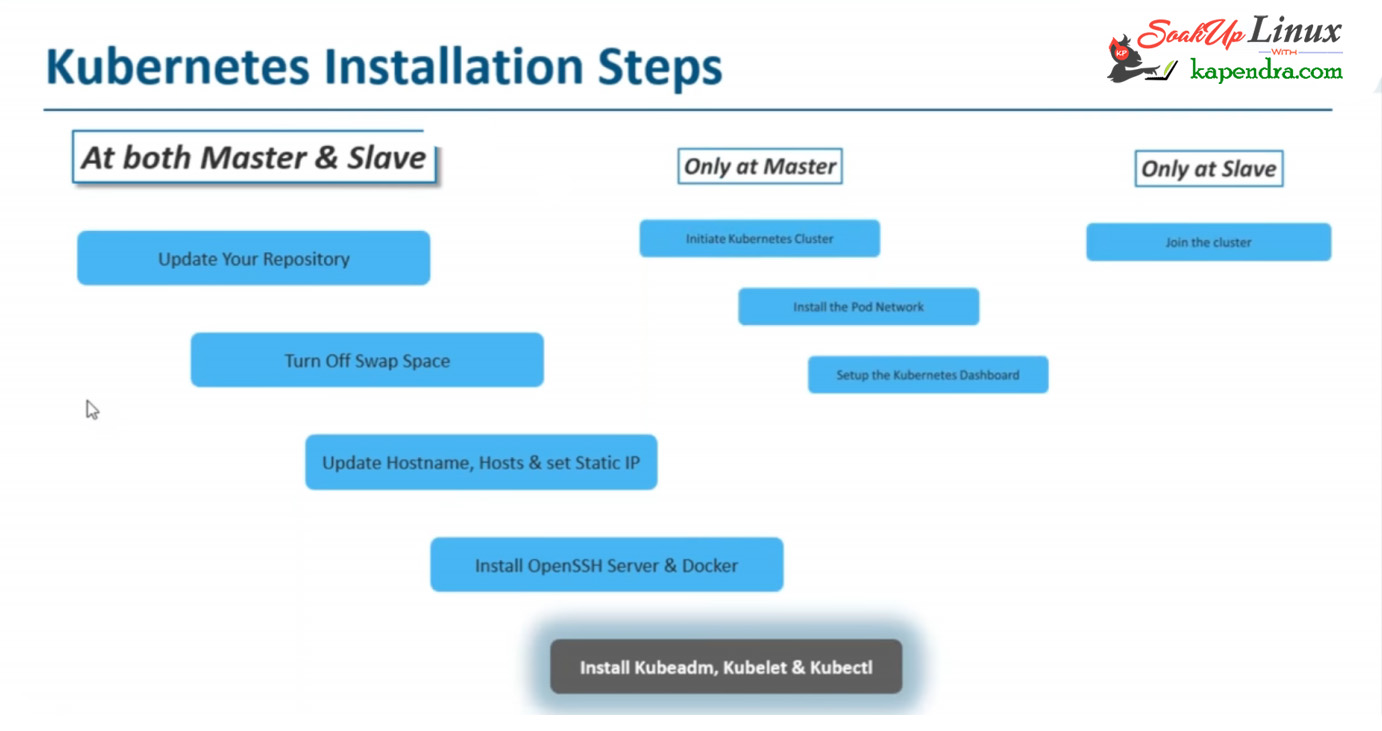
Let’s Start
Section 1: Commands To Run On Both Master and Slave
Step 1. Install Repo and Update Server
To get the latest packages and to remove any pending dependency install epel repo and update your servers by the following command.# yum update
[root@kmaster ~]# yum install epel-release
[root@kmaster ~]# yum update
Step 2: Turn Off swap
To install kubernetes, we need to disable swap permanently by using the following command steps
[root@kmaster ~]# swapoff -a
[root@kmaster ~]# vim /etc/fstab
Comment the line for the swap like below

Save the file using: wq and run the command to remount all the devices
[root@kmaster ~]# mount -a
Step 3: Set Hostname
For internal communication and clear recognition set the hostnames for all the hosts
For master
[root@kmaster ~]# hostnamectl set-hostname kmaster
For worker nodes
[root@kmaster ~]# hostnamectl set-hostname knode1
[root@kmaster ~]# hostnamectl set-hostname knode2
Step 4: Set static IP
Now for communication, we need static IPs on all the nodes
[root@localhost ~] vim /etc/sysconfog/network-script/ifcfg-eth0
DEVICE=eth0
HWADDR=00:0C:29:CA:15:5A
TYPE=Ethernet
UUID=7f32e6fe-4230-4430-92a7-b5a7091600ce
ONBOOT=yes
NM_CONTROLLED=no #
BOOTPROTO=static #
IPADDR=192.168.56.101 #chnage this IP for worker nodes
NETMASK=255.255.255.0 #
Save the file using: WQ and restart network service change your value in # lines according to your network
[root@kmaster ~]# systemctl restart network.service
Step 5: Set Host file
Update host file for master and node on all servers for resolving each other with the name against IP.
[root@kmaster ~]# vim /etc/hosts
192.168.56.101 kmaster
192.168.56.102 knode1
192.168.56.102 knode2
Update this information on all three nodes save the file using: wq
Step 6: Disable Selinux
We need to disable selinux, use the following command to disable selinux
[root@kmaster ~]# setenforce 0
[root@kmaster ~]# sed -i --follow-symlinks 's/SELINUX=enforcing/SELINUX=disabled/g' /etc/sysconfig/selinux
Step 7: Stop and disable FirewallD
Kubernetes also requires to stop and disable FirewallD service. Run the following command to do so
[root@kmaster ~]# systemctl status firewalld
[root@kmaster ~]# systemctl disable firewalld
[root@kmaster ~]# systemctl stop firewalld
Step 8: Enable br_netfilter Kernel Module
This step is required if you are using iptables else you may skip this step but I would say go for it.
[root@kmaster ~]# modprobe br_netfilter
[root@kmaster ~]# echo '1' > /proc/sys/net/bridge/bridge-nf-call-iptables
Step 9: Reboot servers
Now reboot your VMS or machine so that we may start installing the Kubernetes cluster
[root@kmaster ~]# reboot
Step 10: Set UP repo for Kubernetes
To get install Kubernetes onto your system we need to set up a repo for kubernetes run the following command to set up the repo
[root@kmaster ~]# cat <<EOF > /etc/yum.repos.d/kubernetes.repo
[kubernetes]
name=Kubernetes
baseurl=https://packages.cloud.google.com/yum/repos/kubernetes-el7-x86_64
enabled=1
gpgcheck=1
repo_gpgcheck=1
gpgkey=https://packages.cloud.google.com/yum/doc/yum-key.gpg https://packages.cloud.google.com/yum/doc/rpm-package-key.gpg
exclude=kube*
EOF
Step 10: Install Kubernetes and its component
Now we will install the Docker open-ssh kubeadm and Kubelet. Also, don’t forget to enable your service. To do this run the following command to archive your requirements.
[root@kmaster ~]# yum makecache fast
[root@kmaster ~]# yum install -y kubelet kubeadm kubectl docker --disableexcludes=kubernetes
[root@kmaster ~]# systemctl enable kubelet && systemctl start kubelet
[root@kmaster ~]# systemctl enable docker && systemctl start docker

Step 11: Change the cgroup-driver
We need to make sure the Docker and kubernetes are using the same cgroup. Check Docker cgroup using the Docker info command. And Update Kubernetes conf File
[root@kmaster ~]# docker info | grep -i cgroup
Cgroup Driver: cgroupfs
And you see the docker is using `cgroupfs` as a cgroup-driver. so make changes in kubeadm config file using the below command
[root@kmaster ~]# sed -i 's/cgroup-driver=systemd/cgroup-driver=cgroupfs/g' /etc/systemd/system/kubelet.service.d/10-kubeadm.conf
After these changes reload the daemon and restart the services
[root@kmaster ~]# systemctl daemon-reload
[root@kmaster ~]# systemctl restart docker && systemctl restart kubelet
Don’t worry if you get this “Failed to restart Kubelet.service: Unit not found”
With these commands, we have completed our installation section 1. These were the command we need to run both end node and master end
We will continue this installation in part 2 along with section 2 and section 3
Kubernetes Series Links:
Understanding Kubernetes Concepts RHEL/CentOs K8s Part-1
Understanding Kubernetes Concepts RHEL/CentOs k8s: Part-2
How to Install Kubernetes on CentOS/RHEL k8s?: Part-3
How to Install Kubernetes on CentOS/RHEL k8s?: Part-4
How To Bring Up The Kubernetes Dashboard? K8s-Part: 5
How to Run Kubernetes Cluster locally (minikube)? K8s – Part: 6
How To Handle Minikube(Cheatsheet)-3? K8s – Part: 7
How To Handle Minikube(Cheatsheet)-3? K8s – Part: 8
How To Handle Minikube(Cheatsheet)-3? K8s – Part: 9


